Search results for 'mac and'

Kimball Potatoes

11 Sep

I had to call my sister to get the history on this recipe, and she had to call her mother-in-law. It’s a good thing she did too because we had the details all wrong! Sometimes word-of-mouth isn’t always the most accurate way to pass on information. 🙂 So here’s the truth, the whole truth, and nothing but the truth about the history of Spencer W. Kimball Potatoes:

Spencer W. Kimball was the 12th President of the Church of Jesus Christ of Latter Day Saints, but before that, he served as the President of the Quorum of the Twelve Apostles. My brother-in-law’s grandfather had served as a Stake President in the Church for 20+ years, and was going to be released. Since he had dedicated so much of his life to this calling, Elder Kimball was sent to personally release him and thank him for his service – an exciting, but daunting experience to host a great man like that I’m sure! His wife being out of town, Grandpa called on the talents of his daughter-in-law, my brother-in-law’s mother. He asked her if she could host the welcome dinner for Elder Kimball and prepare the food. She did what any good daughter would do, in-law or otherwise; she said, “Of course,” and promptly called her mother for advice. Together, they planned out the dinner, which included a potato dish that her mom had made up and had had great success with.

The day of the dinner, all hands were on deck, including my  brother-in-law’s two older siblings. This was before the days of frozen hash browns, so the potatoes had to be peeled, shredded, and soaked multiple times so that they didn’t turn gray. Can we say, ‘time consuming?’ The dinner was a success and Elder Kimball was gracious and complimentary of the meal. Here’s where the story got a little twisted – we were all thinking that the reason why everyone called them “Kimball Potatoes” was because Spencer W. Kimball loved the dish and raved so much about them that he had to have the recipe. Though I’m sure he thoroughly enjoyed them (it’s hard not to, they are really good!), he never singled them out specifically in the meal. The name wasn’t contrived until shortly after the entire ordeal was over and done with. Little Tom, who had probably been less than helpful in the kitchen that day :), but was there none the less, told his mom one day, “I want potatoes.” She tried and tried to figure out what kind of potatoes he wanted, but you know how helpful toddlers can be – very insistent on having just exactly what they want, but never doing a very good job conveying exactly what that is. Finally, he said, “I want the President Kimball potatoes!” And the name stuck.

Lucky for us, some brilliant person started peeling, shredding, and freezing potatoes for us, so this dish has gone from a fancy-schmacy, all day in the kitchen kind of dish, to the easiest thing in the world to prepare (you can tell people you slaved all day if it makes you feel better). Make it. Enjoy it. And share its history – just be sure you tell it right. 😉

Kimball Potatoes

Ingredients:

1 large bag of shredded, frozen hash browns

1 pint whipping cream
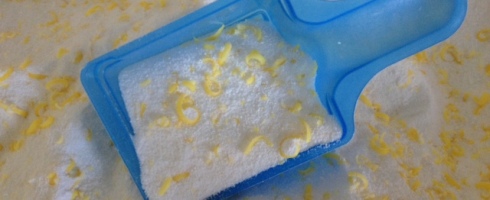
minced onions

salt and pepper

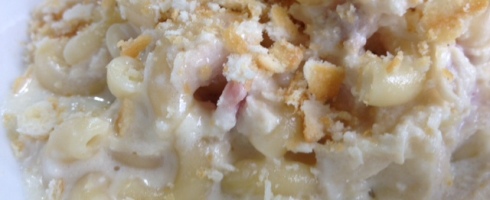
Pour half of potatoes into a 9×13 baking dish. Sprinkle salt, pepper, and onions to taste. Repeat, spreading the second half of potatoes on top of the other. Pour whipping cream over the top evenly. Cover with foil and bake at 350^F for 45 – 60 min.

Cordon Bleu Pasta

6 Sep

My local grocery store posts recipes on their website weekly. I’ve never tried one before, but gave this one a go last night for dinner. I was going to be gone, so I needed something that I knew the kids would eat so my husband didn’t end up with a battle on his hands (yeah, I’m thoughtful like that). I thought this Cordon Bleu Pasta might be more like alfredo, but I was surprised to find that it was actually quite different. It’s definitely not a low-fat recipe with 2 sticks of butter and 2 cups of cream! But you have to indulge every now and then. 🙂 I snitched a bite or two (or four to be exact) before heading out, because it’s pretty much against the rules for a cook to not taste test – plus, it being a new recipe, I was hoping my plan of making a kid-friendly meal hadn’t backfired. Good new is, everyone loved it. And it was way simpler than a traditional Cordon Bleu.

photo-163

Ingredients:

16 oz pasta

1 cup butter

1 cup swiss cheese

2 cups cream

2 cups chicken, cooked and cubed

1 cup ham

1 cup bread crumbs

Cook pasta per package directions – set aside. In a saucepan, melt butter. Stir in cheese and cream until blended. Continue heating, stirring constantly, just to boiling. Remove from heat. Toss pasta, meats, and sauce together. Sprinkle with bread crumbs (or crushed Ritz crackers!) on top and serve.

*Original recipe found here: http://maceys.com/recipes/recipe?id=46

Raspberry/Strawberry Pretzel Dessert

4 Sep

This could probably be considered a guest blog post…considering the fact that I didn’t make this one, nor have I ever. But! I don’t always have an excuse to make big desserts (or I’ll end up eating the whole thing by myself or throwing half of it out), so I have to take advantage of when other people do. 😉 My sister, who’s cookbooks are still packed away from her move, called for the recipe and I gave it to her…on one condition. She had to take pictures. Lucky for us both, she complied. It’s fitting that she made this one since she introduced me to it last Thanksgiving. I’m not always a huge fan of gelatin – flash back to one fateful day at Chuck-a-rama, where a little version of me saw the jello bar…that glorious jello bar, with all those different, shiny flavors…and then my mom told me that I had to finish all the jello I heaped on my plate before I could have ice cream. I tried, I really did. That ended with me sitting by the toilet in the restaurant bathroom. I never did puke, but I came pretty darn close. I wanted that ice cream so bad and I never did get some. I think my mom would have taken pity on me for the effort that I applied to that mountain of jello, but I couldn’t stomach anything afterwards – not even ice cream. It ruined my taste for gelatin for a long while, but I was converted back with this dessert. The pretzels, as out of place as they may seem in a gelatin dish, give that salty-sweet taste and a little bit of a crunch = yum. Someday I may even make myself!

IMG_2505

Crust:

2 1/2 cups crushed pretzels

3/4 c sugar

1.2 c melted butter

Crush pretzels. Set aside 1 cup pretzel crumbs for topping. Combine the rest of the crumbs with butter and sugar. Press into 9×13 baking dish. Bake at 400^F for 7 minutes. Cool.

Filling:

2 8 oz pkg. cream cheese, softened

1 cup powdered sugar

1 12 oz tub cool whip

Whip together cream cheese and sugar. Fold in cool whip. Pour on top of cooled crust. Refrigerate for about 1 hour.

Topping:

1 box raspberry or strawberry Danish Dessert (found in grocery aisle by puddings), Jello, or pie glaze

10 oz frozen raspberries or strawberries, thawed

Prepare Danish Dessert or Jello as directed. Drain syrup off thawed fruit and add fruit to Danish mixture. Stir together. Spread on top of cream cheese layer and refrigerate until set. Sprinkle 1 cup crushed pretzels on top when ready to serve.


Garlic Basil Pizza

25 Aug

My family and I just got back from an awesome weekend spent at the Rockin’ R Ranch. This was our third time visiting the secluded Antimony, UT dude ranch, and we’re already counting down the days until we can go again. My four year old worded it the best: “I don’t want to go, Mom! We’ve only been here a minute!” I whole-heartedly agree. Trail rides, canoeing, corral training, bucking barrels, tubing down the river, archery, treasure hunt and coloring for the kids, candy cannon, brand new baby donkey to ooh and ah at, ATV’s, no internet or TV…and the food. Oh, my friends…the food. Nothing at the Rockin’ R is gourmet – it is down home cookin’ and down right delicious. The best part? Someone else cooked it. 😉 We got home to the kitchen that I didn’t quite get all the way tidied before we left, and I looked at my husband and said, “Remember how we just spent two days in a beautiful place, riding beautiful horses, and had all our meals cooked for us? Let’s go back.” The smells that come out of that back kitchen are stomach-rumblimg good, regardless of the fact that you just ate three times more than you usually do and are stuffed like a Thanksgiving turkey – you still would happily eat more as long as it tastes as good as it smells. The first night they had some sort of blueberry spice cake that I may have to try to steal the recipe for. Top that off with roast beef, mashed potatoes and gravy…it was good stuff. Aren’t you all sad you didn’t come with us?

We got home (it’s a three hour drive for us) and of course the kids were starving, and I was still musing on the fact that small town living is starting to sound really good if I can have someone cook all of my meals…when “Pizza!” interrupted my day dream of rotisserie chicken and garlic toast. My kids always want pizza. The funny thing is that, I think I’ve mentioned the difficulty that my kids have with pizza – namely the sauce. They all hate marinara sauce! So their ‘pizza’ is really bread with cheese on it which I think is terribly boring. Unless its alfredo pizza. I like alfredo, but I also like to have a variation every now and again. I found this white pizza sauce recipe and it was a big hit. It’s also fast and easy (just how I like it) and helped me ease back into the fact that I am still the one responsible for cooking in my own home. Sigh.

photo-139

Crust:

4 cups flour

1 tsp salt

4 Tbsp oil

2 cups water

1 Tbsp sugar

2 Tbsp yeast

Mix sugar and 1 cup hot water; add yeast and set aside. In a separate bowl, mix together dry ingredients. Add yeast mixture to dry ingredients. Add final cup of water (you may not need the whole cup) and mix until dough forms a ball (should be sticky – not too dense). Cover and let dough rise until doubled in size. Punch down and let rise a second time. Roll out on floured surface, then form pizza rounds. Tip: cover baking surface with corn meal to prevent sticking. Cover with sauce and cheese (can add other toppings like grilled chicken, etc). Bake at 400^F for 20 min, or until cheese is melted and crust is cooked through. Yield: 2 pizzas

photo-141

Sauce:

2 Tbsp butter

3 Tbsp flour

1 cup milk

1/4 tsp salt

1/8 tsp pepper

1 garlic clove, minced

1 Tbsp basil, minced

1/2 cup pizza blend cheese (pre-grated mix)

Heat butter in a saucepan. Add flour and stir until thoroughly mixed. Slowly add milk. Stir in remaining ingredients, except cheese, and cook until thickened. Remove from heat and stir in cheese until melted.

photo-138


Laundry Soap

23 Jul

Alright, in this case, please keep your mouth closed! No eating the laundry soap. I started making my own laundry soap about a year and a half ago. I had a neighbor give me a recipe  (that I keep losing – hence the reason why it’s here now), and when I found out it was comparable to about a penny a load and actually cleaned your clothes, I was sold! It is kind of ridiculous how much laundry soap costs once you realize how cheap it is to make your own. I’ve always done a liquid version because I was a little nervous about the soap not dissolving all the way and leaving a residue, but this time around I decided to go for the powdered version. All the testimonials say that it dissolves fine, even in cold water, so I gave it a go. The liquid version I make about twice a year and use 1/2 cup per load. The powder you only use 1-2 Tbsp per load, so I’m guessing it will last significantly longer. I tested out the first two loads today and I’m pleased with how everything turned out – the soap actually began to dissolve right away. If you look on Pintrest or one of those cutesy sites, everyone has their soap in really sweet containers with vinyl lettering and colored crystals…I’m boring. Laundry is laundry to me, regardless of if you dress it up in a nice bottle or not. 🙂 So, I have mine in a giant tupperware container! Real glamorous. I’ve got both versions listed below – liquid and powdered. No picture of liquid because I just ran out (remember, I’m potty training…my washing machine is working overtime right now)! I think both liquid and powdered do comparable jobs. The powdered has a few more ingredients, takes a little less time to make, and will last longer. But it’s time consuming to grate the soap bars (I only grated my knuckle three or four times and my fingernail once :)), but its a great arm workout! The liquid has to be done on the stove, but the longest part is letting the soap dissolve, and you can just leave it alone to do that – no babysitting required. You do have to come up with containers for the liquid. Some people will recycle milk jugs or vegetable oil containers, or you could just use a 5 gallon all purpose bucket. I went to the dollar store and bought six 3 qt containers. I like that size because they are small enough to shake (you have to agitate the soap before using it) but large enough to not have thirty-thousand bottles of soap cluttering up the laundry room. All in all, I don’t really have a preference as to which is better – try them both and decide for yourself!! My daughter asked what I was making and when I told her, “Laundry soap,” she said, “With cheese?” 🙂

photo-82

Powdered:

Ingredients –

1 (4lb 12 oz) box of Borax

1 (3 lb 7 oz) box of Washing Soda

1 (3lb) container of Oxiclean

3 (5.5 oz) bars of Fels Naptha

1 (4lb) box of Baking Soda

Using a cheese grater, grate the Fels Naptha bars finely (if you have a food processor or blender, you can pulse the grated soap in them until powdered – I didn’t opt for this since I was afraid of ruining my blender!). Mix all ingredients together in a large bucket or trash bag and store in air tight container. You can add essential oils or Purex crystals if you want to add scent to the soap. Use 1-2 Tbsp for regular loads.

Liquid:

Ingredients:

1 (5.5 oz) bar of Fels Naptha

1 1/2 cups Washing Soda

1 cup Borax

Total of 4 1/2 – 5 gallons of water

*optional 1 cup Oxiclean

Chop the bar of soap and melt over medium heat in 2-3 quarts of water (about 30 min). Once melted, add in the washing soda and borax and optional Oxiclean. Simmer 3-4 minutes, making sure powders have dissolved. In a 5 gallon bucket, add one large pot of boiling water. Add your soap mixture to the bucket and stir well. Add hot tap water to within 2-3 inches from the top of bucket. Stir well. Using a funnel, while mixture is still hot, pour into empty containers, leaving 2-3 inches of head space. Place lids on top and let sit for 24 hours for detergent to set up before using. You will need to shake the bottles quite a bit to break up the chunks of detergent that will form after it sets up. Detergent will stay a little clumpy – lightly shake bottles before each use. Use 1/2 cup detergent for regular loads. Use 1/4 cup detergent for HE washers.

P.S> Don’t be scared to try this! All of the ingredients can be found at your regular grocery store on the laundry aisle.

Banana Milk

19 Jul

We’re going for simplistic today. I decided to start potty training my two year old two weeks after we brought our new baby home – I’ll give you one guess how that turned out. I quit after three days. Baby is almost six weeks old now, and as much as I hate potty training, big sister is ready and I am going to have to suck it up and stick it out. We are on day three now, so as long as I make it to tomorrow…what I didn’t count on was the fact that she’s got a little stomach bug right now. Stomach bug = diarrhea. Not really something I should talk about on a food blog, I know. I won’t go into detail, I’ll just say that I’m not having fun. We’re trying to keep with a basic diet of saltines, toast, and high fiber foods like bananas. She was really excited about the banana – so was I, until she started squishing it while still in the peel. Not much you can do with a squished banana. Luckily, I had just the thing…and yes, I totally spilled while taking my ‘pouring’ picture. 🙂

photo-74

Ingredients:

4 cups milk

2 large bananas

1/8 – 1/4 cup sugar

Place milk and bananas into a blender or food processor and blend until smooth. Add sugar to taste – less is more! If you get it too sweet you lose the banana flavor. Blend until sugar is dissolved.

photo-75